Showing posts with label Budget Crafts. Show all posts

Easy LOVE Banner

Are you ready for the day of Love?  Valentines?  It will be here in 10 days!  There is still time to whip up a little love for your home.
For my farm house mantel, I kept many of my Christmas items (candles and glass jars with red balls).  I pulled other things from around the house: a couple of red books I purchased from Goodwill and the little red pitcher that I believe I picked up at Dollar General a few years ago.  Plus my clearance find heart ornament from Target that I picked up for 10 cents!  I wanted a little bit more.

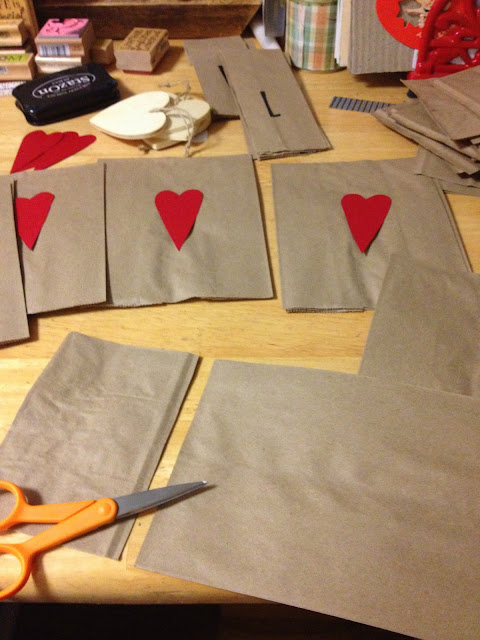
Then I whipped out my old scrapbook supplies and paper lunch bags to make my little love banner.
 I cut the bottom off each bag.  The cut them in half length wise.  The little red hearts were hand cut from a nice piece of thick cardstock.
I inked the edges of the hearts and stamped the other letters on with foam stamps.  A bit of twine, a little hot glue and it's complete.  I might have made more than one.
I LOVE it!  Seriously.  Plus it was so very simple.  Like I have always said, it doesn't have to cost a pretty penny to be beautiful.
Do you decorate for Valentines? 
I don't go all out, in fact, the above is it.  Besides, I think I can leave this up somewhere in the house after I take it off the mantel.
Sharing here:
Creative Cain Cabin

Homemade Christmas Gifts Review

Since the gifts have been unwrapped, I can share what I've been working on the last several weeks.
The HIT of this Christmas were these:
Photo blocks for family.  I selected photos specific to the person along with other family photos. They were simply painted black with craft paint, then Mod Podge for attaching the photos and sealing the blocks.
A note about these if you decide you want to make them.  We did NOT use 4x4 posts because that wood is pressure treated and could eventually ruin the photos.  Mine are made with 1x4's wood glued together and then cut to size.
For the women I made felt flowers from this awesome tutorial at Creative Cain Cabin.
Plus I made a braided fabric necklace for my college age niece.  Here is a tutorial on the fabric necklaces, however I didn't sew mine together.  I knotted the ribbon ties to the ends.
I plan to make a ton more of felt flowers for myself!  I LOVE them and they are adorable in all colors with outfits.
Along with the above, I also made 4 teacup candles.
Unfortunately due to the fact I was finishing these up at the last minute, I only took a photo while waiting on the wax to dry.  Bummer!  They had adorable matching saucer plates that I glued the cups atop to complete the gift.  This was my VERY FIRST time with candle making and it was fun.  I scented them with sugar cookie smell so they will be perfect in the kitchen.  I'm sure I will be making more of these in the future.

I personally LOVE homemade useful items and were thrilled that these were appreciated.
Did you gift Homemade this year?  I'd love to see!
Leave me a link and I will check it out.  Of course, Pinterest inspired several of mine and you can find my favorite pins HERE.

Merry Country Christmas!

As we simply celebrate today with family and loved ones; I want to wish each and everyone of you far and wide a magical Merry Country Christmas from our Farm to your Home. 
(my three - my daughter, my oldest son and our new addition, my nephew, who I have permanent custody and is now our 'youngest' babe).
It has been a very magical and exciting season for us all, as we have enjoyed having Bear as a new addition to our family.  He is a delightful child, amazed by all the wonders he hasn't had the opportunity to experience in such a manner before this year.
There has been a whirlwind of activities building up to the big day:
Our 'Elf on the Shelf' arrived December 1st to Bear's delight and kept us on our toes all month
with frolics and play.  You can read about 'Sam' and his adventures in my two previous posts of Elf on the Shelf Fun part 1 and part 2.
We attended the local Christmas Parade where we saw Santa!
and enjoyed rides to see the lights.
Bear had a fun play date making his own gingerbread house.
We made Christmas crafts:
Snow globes with 'magic' no melt snow.
Ornament, made at 'school' which is really daycare, but don't tell Bear.
and tiny trees.
We've read Christmas stories, attended family gatherings, sang carols and even received a special video from Santa himself!
Today we enjoy staying home wrapped up in the love of family.
Again,

Thrifty Gift for Anyone on Your List

I love making neat gifts for the people on my list: family, friends and co-workers.
These would also be a great little gift for a teacher, pastor and teens.
I employ student assistants in my office at the University. And each received...
Book 'thongs' (or bookmarks).
This nifty gift is usable, thrifty, easy, quick and you can make it to match personalities.
Here is what you need to whip out one for any reader on your list:
A book - to measure the length.
Psst - I ended up not needing to use the needles
Waxed Linen cord ($1.99 from Hobby Lobby)
Beads (tube and other assorted sizes)
A charm (for each book thong: pick one to match the person)
I also plan to use a few sea shells on the bottom of mine, in place of charms.
Scissors
Clear nail polish
First - measure the cord in a book, leaving extra to thread your beads and for knots to hold the beads in place, along with the charm on the end.
2.  Tie your selected charm on the end of the cord.
3. 'Seal' the knot with your clear nail polish.
4. Add assorted beads.
5. Tie a knot at the top of this beaded line to hold the beads in place.
6. Nail polish the knot.
7.  Add more beads to the other end of the cord.
8.  Tie a knot under the beads to hold at the 'top' part of the cord.  Don't forget to measure this section in your book.
9. Nail polish the knot and cut off excess cord.
Seriously it's really easy and they are fast to make!
Pair with a new book, gift card to a bookstore or do what I did for my students;
insert them in a Christmas card with a personal message.
I used wooden beads on the guy gifts.  A bit more 'manly'.
What homemade gifts are you making this year?
Linking in to various crafty blog parties this week, see the links in my blog party tab at the top of my page.

Wood 'Chip' Christmas Ornaments

When I had the wood cut for my log candle votives. There were little pieces leftover.
So I gathered up my supplies to make a few ornaments to go on our small tree.
I simply stamped the wood with StazOn ink.
Then hotglued on some twine to the back.
A quick and easy project that resulted in FREE ornaments for our tiny kitchen tree.
You could make an entire set of these as a gift idea!
Other ornaments are mini cookie cutters tied on with twine and some mini gingerbread 'cookies'.
A bit of raffia for garland and pinecones stuck on branches.
I've always wanted a tiny tree in the kitchen. This one is really simply decorated in naturals. 
Nothing fancy, but it makes me smile.  I love that bit of Christmas shine on my kitchen island. 
I am happy with my 'new' totally free decorated tree!
Sharing this in several great link parties, check out the blog parties tab at the top.
For tons of other Christmas craft inspiration hop on over to this Holiday party:
Visit thecsiproject.com
Have you made ornaments this year?  Leave me a link in my comments! I'd love to check them out.

"Log" Candle Votive

Last weekend I spotted something on HGTV that inspired me to whip out these:
Wood log candle votives. A VERY inexpensive gift idea!
These began here ~
The log pile.
So I headed to the barn workshop and cut the wood to 3 different lengths.
Ok so *I* didn't actually do the cutting.  ;-)  Notice that I also cleaned up and staged the pic?
Only the best for my blog buddies.
Then there needed to be a hole for the tea light candle.
Another big tool and a bit of whining, pleading, threatening, begging for some assistance.
The wood drill thingie is 1 1/2" bit, in case some of you want to make these.
Cuts the perfect size hole for tea lights.
Now if you had to purchase those big ole machines, these might not be frugal!
I had tea lights and the wood.
So these were FREE!!!
I just love the SHINE they add to our Merry Mantle.
Guess what?! To make the logs level we ended up with some of these ~
Which inspired me for another upcoming project/gift idea!
Sharing on several crafty blogs, so check out ALL the weekly links on my Blog Parties tab at the top of the page.  There is SO much inspiration in Blog land.
I'm also entering:
Visit thecsiproject.com

Making a Unique Wreath

My cell phone rings at work last week, it's my Mom.
She wants a different, 'unique' wreath for her store front.
I have an idea.
So we head to the local Home Depot for a 1x2 piece of 'white' light weight wood. 
Cut, nail the wood together then spray painted green.
A quick stop by Hobby Lobby to pick up garland at 50% off ($3.99).
Mom also purchased a half off roll of ribbon.
At first I thought we would wrap the garland, however it has a thick wire base.
So another idea hit me upside the head.
Does that ever happen to you?
We bent the garland and stapled it to the 'top' part of the frame, then cut sections stapling it to the inside for a full look.
I simply LOVE this inexpensive garland from Hobby Lobby!
I purchased another strand to use on my mantle this year.
It pulls apart like a silk tree.
For a beautiful and different wreath style base.
Like the hot tub 'table'? We watch deer play in the backyard from this spot in the evenings.
Weather is getting chilly enough for a nightly dip.
Back to the wreath.
The wired ribbon is simply wrapped around the frame and Mom made the beautiful bow.
Then we hunted items around the beauty shop for several tools of her trade, added with floral wire.
Along with a few on hand silver Christmas ornaments.
Still needs a bit of bling.
Red glitter ting ting here and there, silver picks in one corner and white added behind the bow.
One custom made beauty shop wreath.
Extra ribbon turns their doors into presents with Mom making a couple of smaller bows.
A small town Beauty Shop all decked out for the holidays, complete with a tree inside and icicle lights.
Brings to mind scenes from Steel Magnolias, imagine all the gossip about a rectangle wreath!
You can put together your own unique wreath inexpensively.
The base breakdown:
Wood - $1
2 strands of garland - $3.99 each
Spray paint, nails, staples (on hand)
Cost $9!!
Add your own Christmas ornaments, pine cones, etc.
What style would you shape for a wreath?
I would love to see yours!
Linking our project in on some fun parties, find all the great blog inspiration here.

Thanks to Stephanie for the feature of my project on her blog!
UndertheTableandDreaming
Related Posts with Thumbnails